Getting started
myQLM contains tools for writing, optimizing and simulating quantum programs. These tools are packaged
in a Python library named qat, for Qaptiva Application Toolset.
myQLM also interfaces with the Qaptiva™ Appliance, the quantum programming appliance of Bull.
This library provides powerful semantics for creating quantum circuits, analog schedules, and quantum annealing jobs. These objects can be parametrized with abstract parameters (for variational quantum computing) and composed of user defined items (custom gates in a circuit, custom time-dependent coefficients in an analog schedule, etc.)
The following code snippet creates and simulates a simple Bell pair circuit:
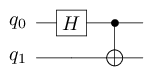
from qat.lang import qrout, H, CNOT

@qrout
def bell_pair():
    H(0)
    CNOT(0, 1)

result = bell_pair().run()

for sample in result:
    print(f"State {sample.state} amplitude {sample.amplitude}")
State |00> amplitude (0.7071067811865475+0j)
State |11> amplitude (0.7071067811865475+0j)
The first line of code imports a decorator and two quantum gates. The decorator is used to declare a function that describes our quantum circuit. A detailed description of the quantum circuit generation tools can be found in the programming section.
This function can be directly sampled via the .run method that will look for an available QPU and use it to execute the circuit. More information about this process can be found in the executing section.
from qat.lang import Program, H, CNOT

# Create a Program
qprog = Program()
# Number of qbits
nbqbits = 2
# Allocate some qbits
qbits = qprog.qalloc(nbqbits)

# Apply some quantum Gates
H(qbits[0])
CNOT(qbits[0], qbits[1])

# Export this program into a quantum circuit
circuit = qprog.to_circ()

# Import a Quantum Processor Unit Factory (the default one)
from qat.qpus import get_default_qpu

# Create a Quantum Processor Unit
qpu = get_default_qpu()

# Create a job
job = circuit.to_job()

# Submit the job to the QPU
result = qpu.submit(job)

# Iterate over the final state vector to get all final components
for sample in result:
    print("State %s amplitude %s" % (sample.state, sample.amplitude))
State |00> amplitude (0.7071067811865475+0j)
State |11> amplitude (0.7071067811865475+0j)
The first few lines of code are dedicated to the generation of a quantum circuit and a job, an atomic computation task in the Qaptiva™ language. A detailed description of the quantum circuit generation tools can be found in the programming section.
Then the remaining lines instantiate a simulator, submit the job, and print the simulation results. More information about this process can be found in the executing section.